X-Author for Excel tool by Apttus – A little background
X-Author for Excel by Apttus is a tool that allows you to use your CRM with EXCEL. A deadly combination tool, secure and easy-to-use, it allows you to get the best of both worlds. While using X-Author for Excel, you can have your customer data on your CRM, with all your validation rules, workflow rules, and other rules in place. You can then fetch your data from CRM to Excel; manipulate data in Excel, and save it back to your CRM. Data manipulation includes performing CRUD operations like adding new records, updating existing records, and deleting existing records.
Data Migration
Data Migration means migrating data of objects from one instance org to another instance org. Traditionally, Salesforce offers Data Loader to migrate data from one org to another, object by object. But, this becomes a concern when you have a larger number of objects to be migrated. Hence, data migration has been a concern for a while. X-Author for Excel can help you by creating apps that can migrate data of multiple objects in minutes. The next question that might come to your mind is – how long does it take to create the data migration app? Depending on number of objects and complexity, it might take hours.
However, recently, Apttus added a new feature called X-Author for Excel Data Migration Wizard that enables you to create a data migration app using a Wizard, with fewest possible clicks. All you do is select the objects, select fields, configure your app and VOILA! The Data migration app that took hours to build, now is ready in minutes.
You can use X-Author Excel Data Migration feature to create a tailored app that will suit your business requirements. Let’s get started!
Business Use Case:
JessHarv Inc. is a product company owning a big suite of products in cloud computing. JessHarv Inc. have a huge amount of data and they have to migrate data from one org to another for internal purposes on a daily basis. These migrations have become a routine and they take up a lot of time if they do migration object by object. Jessica, CTO at JessHarv Inc. has decided to give a shot to X-Author for Excel to ease out the process.
JessHarv Inc. have to migrate Leads, Accounts, Opportunities, and Price Lists (custom object) on a daily basis. Now, let’s create an app to help JessHarv Inc. to make their migration process faster and easier.
Building your X-Author for Excel Data Migration App using Wizard
You can build your X-Author for Excel Data Migration app using the following steps: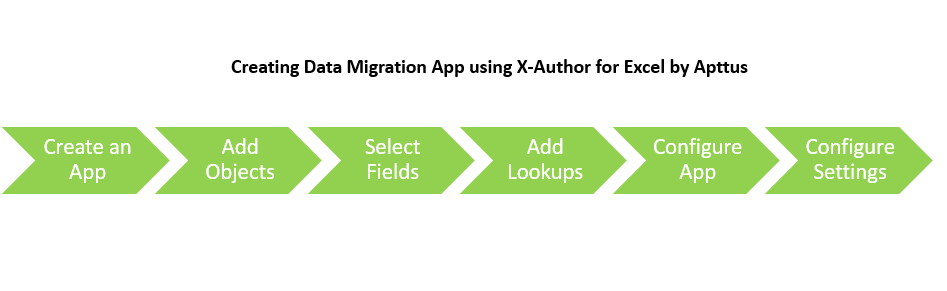
Now, we will look into each steps in detail.
Creating an App
You can create an app using X-Author for Excel. Needless to say, you must have an active license to X-Author for Excel. In our example, we are using JessHArv LOAP Data Migration name. To create an app,
- Connect with the Salesforce instance using X-Author for Excel.
- From the Excel Designer ribbon, click the arrow next to Data Migration and select New.
Enter a name in App Name text box and click Create App.
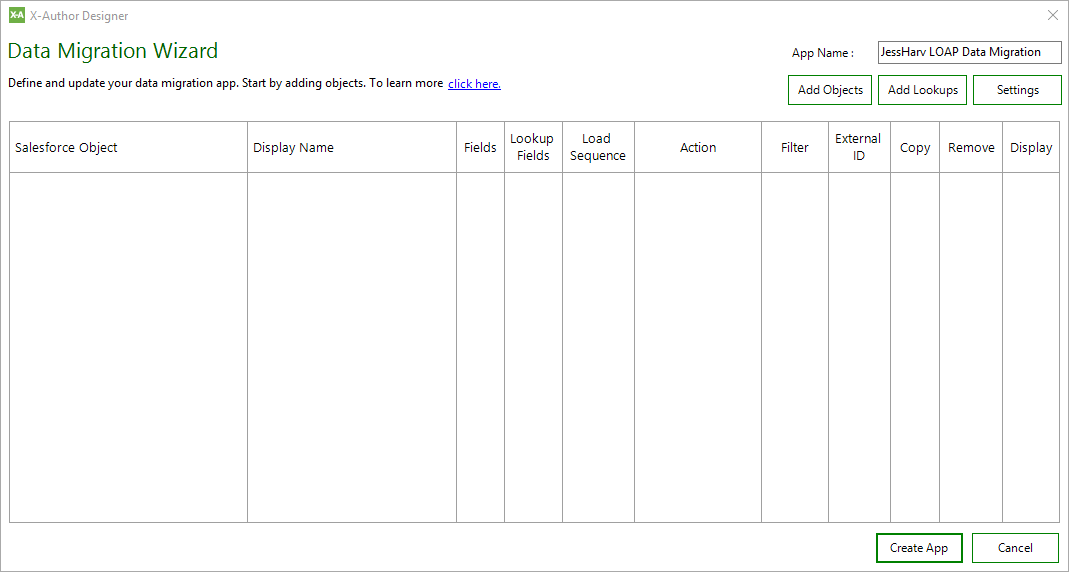
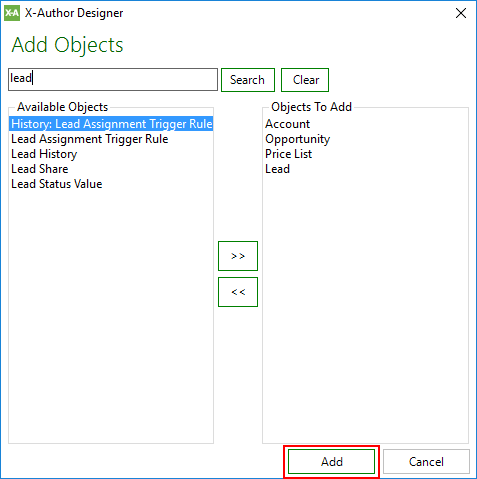
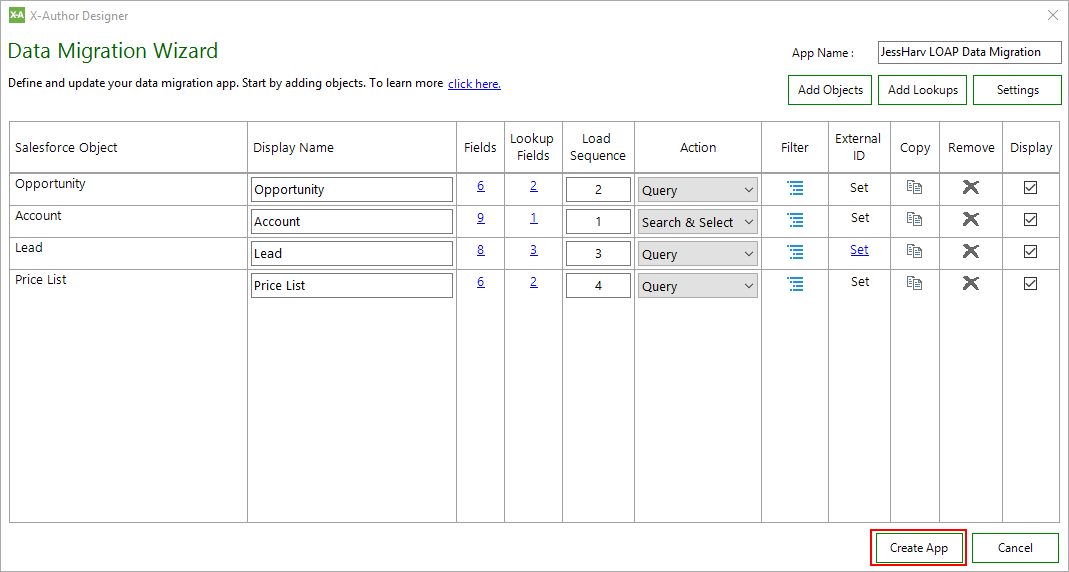
Adding Objects
You can add objects to your app depending on your business requirements. It can be parent-child, or parent-parent, or child-child objects as well. A sequence of objects does not matter here. The sequence of objects is adjusted based on External IDs and Lookups. In our example, we will add Leads, Accounts, Opportunities, and Price List (custom object) objects. To add objects,
- On the Wizard, click Add Objects.
- Search for the object that you want to add and click the Right-arrow to add an object to Objects to Add section.
- Click Add. The Data Migration Dashboard updates records for each object to be added. You must specify a unique object name for each object.
Selecting Fields
You can add the fields that are critical to your data migration. Unnecessary fields can be neglected to avoid any confusion. Keep in mind that you must select fields for each object. Also, note that ID and Name fields are mandatory and they cannot be deselected. In our example, we will add the fields mentioned in the following table:
|
Object
|
Fields
|
|
Account
|
ID
Account Locale Account Name Account Phone Account Type Active DSW Site ID External ID |
|
Lead
|
Account Plan
Account Status Name Id External ID |
|
Opportunity
|
AccountID
ACV IsClosed Name Id External ID |
|
Price List
|
Account
External ID Description Price List Name Record ID |
To select fields,
- Click on the Link under Fields column for the object that you want to select fields.
- Select the check box for each field that you want to add to your data migration app.
- Click Apply.
Select fields for all objects that you have selected.
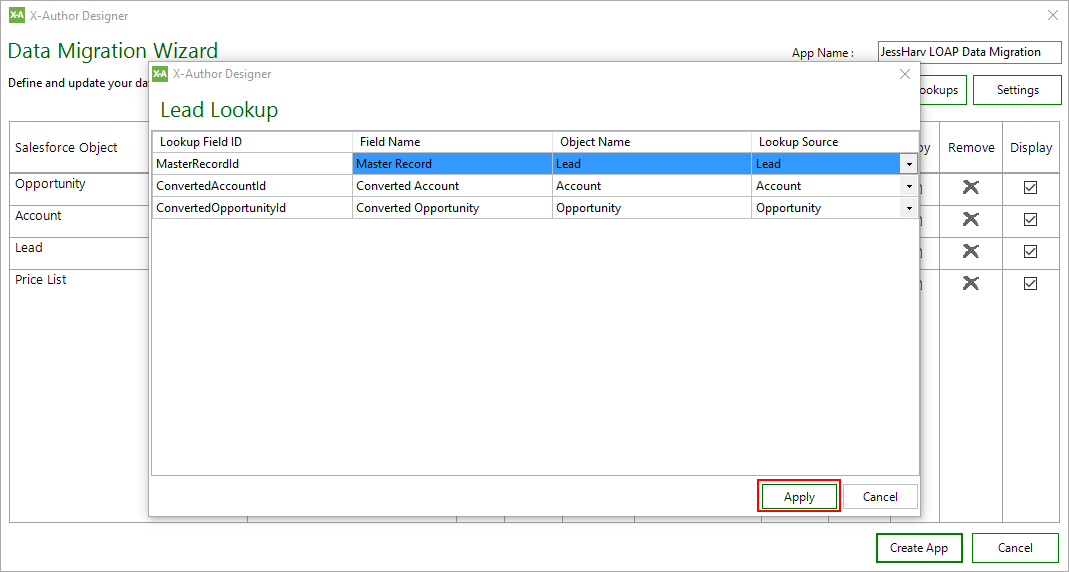
Adding Lookups
You can add lookup fields that refer other objects. You can also add lookup fields that refer the same object. Fields that already exist in your data migration app will not be visible under lookups. To add lookup fields,
- Click Add Lookups. The suggested lookup Object/Field tree is displayed.
- Select the checkbox of fields that you want to add to your data migration app. In case you want to add all fields of an object, select the check box for the object.
- Click Add to add selected fields to your app. A filter (of Account object), as shown in the image below, is automatically created for the object. You must not remove this filter.
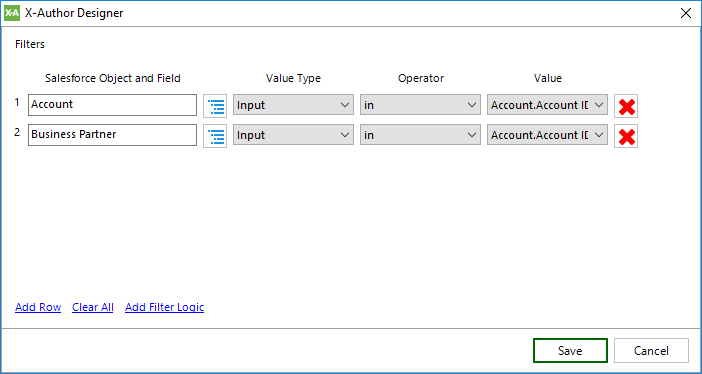
In case your lookup fields require queries to multiple data sets of same lookup object, you can choose the source of lookup of object for each lookup field of an object.
To create more than one lookup source to same object,
- Add more than one lookup field to your data migration object that lookup the same object.
- On Data Migration Wizard screen, copy the lookup object. As a result, you will see two entries for the same object in the Wizard.
- Alter the Display Name to distinguish the lookup sources.
- Click on the Lookup Fields link for the object that you want to change the lookup source for.
- Select the appropriate value of the Lookup Source of the object, as per your business requirements.
- Click Apply. The Export action flow step that corresponds to your data migration app is updated as well. Action Input displays the lookup source of object. Verify the Action Flow steps and Action Inputs.
At the time of execution, a combination of records is retrieved based on the lookup sources that you have selected.
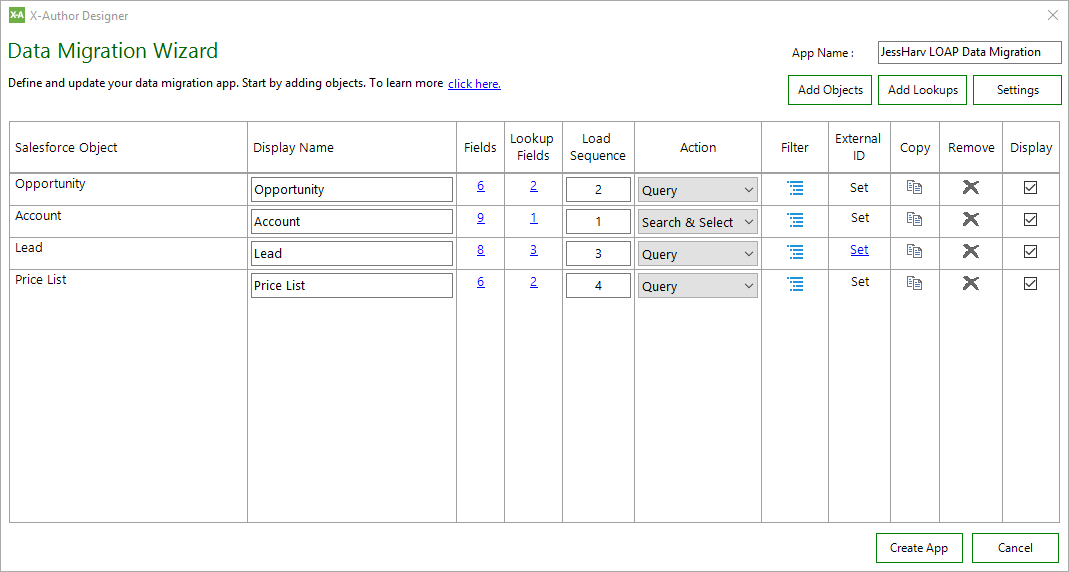
Configuring Data Migration App
Configuring data migration app includes configuring Load Sequence, Actions, and Filters for retrieving data.
Load Sequence: Load Sequence determines the sequence of objects retrieved from your source org. By default, the load sequence contains the numbers in which you have added objects to your data migration app. In case you want to alter the load sequence, specify appropriate numbers in the Load Sequence column of each object. Entering the Load Sequence is mandatory. You must be very careful while adding load sequences. Parent object cannot have a smaller number in load sequence in comparison with the child object.
Actions: Actions allows you to determine the core series of events that will take place. X-Author allows you to select from Search & Select and Query actions. Actions can be set in the Actions column for each object. Data is retrieved from the source org based on the actions and filters defined.
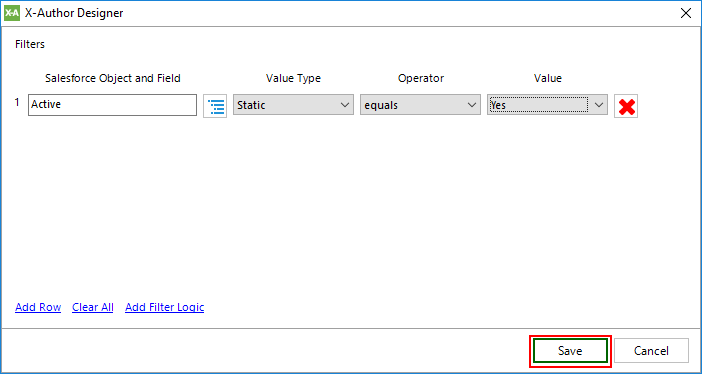
Filters: Depending on your business requirements, you can refine your data (of each object) that you want to retrieve from your source org.
To configure data migration app,
- On Data Migration Wizard screen, edit the Load Sequence for each object if required.
- In the Action column, select the appropriate action for each object.
- Define the filters to refine your data for each object.
- Click the Filter icon next to the appropriate action and select the Salesforce Object and Field.
- Enter Value Type, Operator, and Value for your filter.
- Click Add Row, and repeat steps a and b for each filter you add.
- Click Add Filter Logic and add the additional logic for all filters that you add.
- Click Save.
4. Set the External ID field for each object.
- Click Not Set link for an object under External ID column.
- Select the appropriate External ID field that you want to use for your object. The fields of External ID type will appear here.
- Click Apply. Notice that once you choose the external id field, the label of Not Set link changes to label Set.
5. Disable the sheets that you don’t want to display in your data migration app by de-selecting the Display check box for that object. A different sheet is created for Query or Search & Select action. Hence, if you do not want to display the sheet of data that you have used for retrieving, you can disable that worksheet.
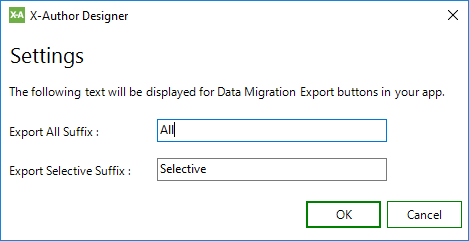
Configuring Data Migration App Settings
You can configure the name of your action on your app. Your app will have two action buttons – Export All, and Export Selective. You can replace “All” and “Selective” part of action buttons with custom text. For example, you can have an action button called “Export Accounts”. To do that, you must replace “Selective” by “Accounts”.
To configure settings of your data migration app,
- On the Data Migration screen, click Settings.
- Enter custom text in Export All Suffix text box.
- Enter custom text in Export Selective Suffix text box.
- Click OK.
Click Create App to finalize your app. Data Migration Wizard creates a separate worksheet for each object of your data migration app.
Modifying Data Migration App
To modify your existing data migration app, click the arrow next to Data Migration on Designer ribbon; and click Edit. You must keep in mind that you cannot edit App Name, External ID, and User Actions.
You must import the data migration app to both source and target org.
Running Data Migration App
You must have necessary permissions to X-Author for Excel objects. Also, you must have an active data migration app in required org to run the app. In Order to run the data migration app,
- Open the data migration app.
- Choose the appropriate option:
- Export Selected: To export specific records of each object from source org. Click Next after selecting appropriate records.
- Export All: To export all records from of each object from source org.
- Click Save Source Data.
- Enter a Name and Save the file.
- Close the app.
- Open your target org and open the app.
- Click arrow next to Paste and select Paste from Mapping.
- Select the source file that you saved in step 4 and click Save All.
Hurray! We helped Jess Harv Inc. to create a data migration app, and successfully migrated data from one org to another. Try creating your own app now!
You can definitely get back to me on LinkedIn or Twitter (@Mitzeey92) in case of any further queries. Please feel free to leave any comments/suggestions/upgrades for this article.