
Sertifi Electronic Signature is an app that can be integrated to the Salesforce org. It allows you to work directly within Salesforce to send, sign, and track contracts and quotes, and collect secure customer payments.
What you need to Know:
- How to add buttons to the Page Layout and List view.
- Basic Salesforce Admin Configurations.
How does Appy Ninja Help?
In Salesforce, the most common way of signing documents such as a quote, invoice, order confirmation documents etc is by sending the document from the salesperson to customers. The customer has to download, sign and reply back by uploading the document again. With this app, we can avoid this time-consuming process. Just by a single click, the document is signed digitally and is sent back.
Configuration Steps:
- After you install the app, go to install packages and click on configure next to Sertifi E-Sign for Salesforce.com.

2. Fill the required fields as mentioned below in order to create Sertifi portal.
- Account Title (usually Company Name)
- Account URL (usually Company Name without any spaces)
- Logo Image (usually company Logo image)
- Salesforce Login – Enter the username you use to login to Salesforce.
- Salesforce Password – Enter the password you use to login to Salesforce.
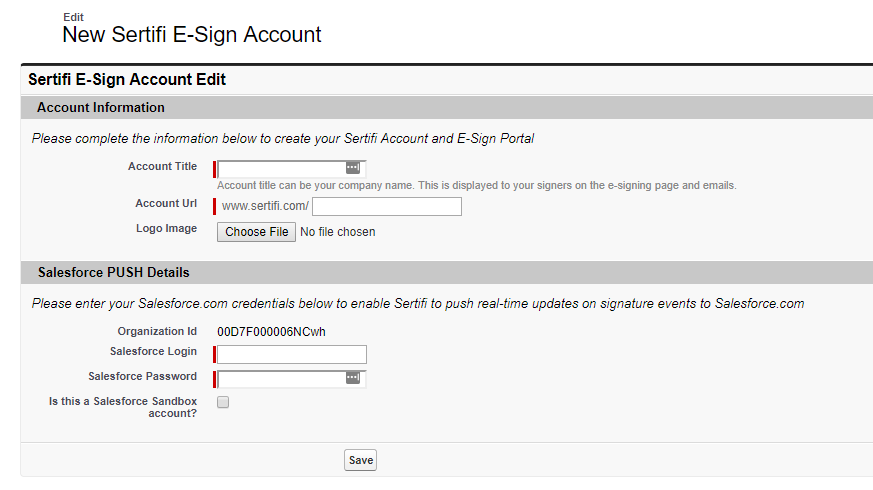
Click Save.
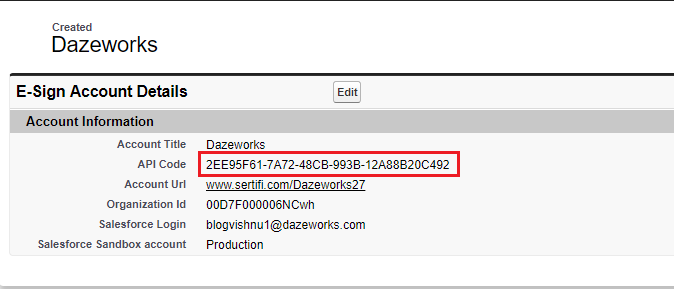
3. After saving, an API code will be generated which is to be noted down for further steps.
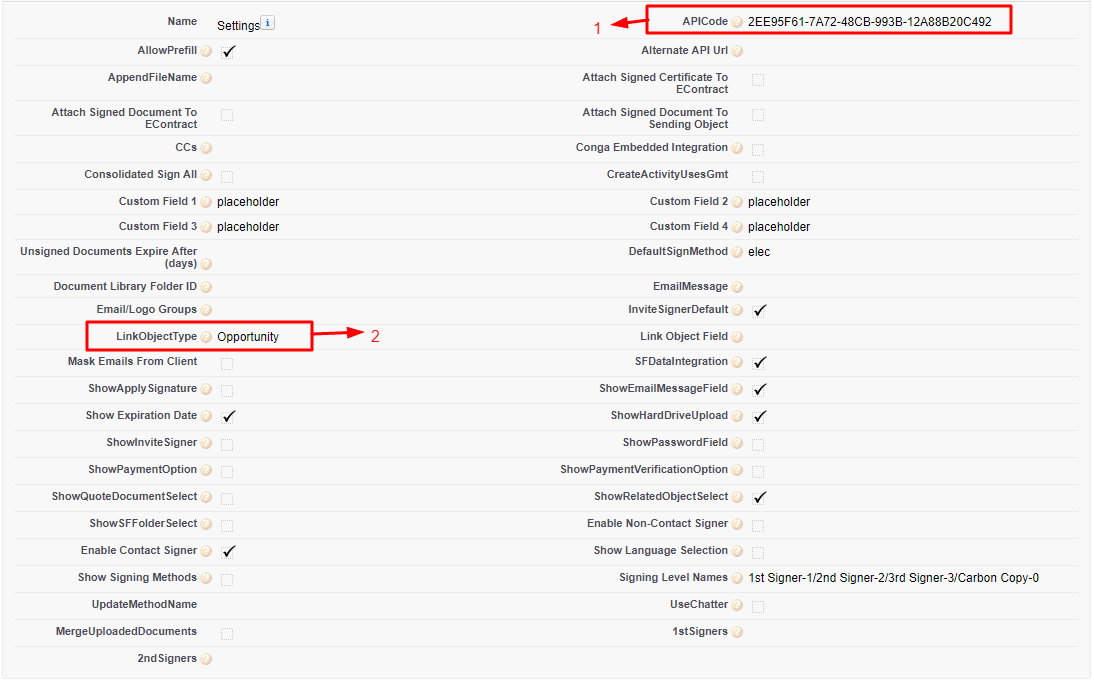
4. Now from Setup go to Develop -> Custom Settings. Click manage in the action column of Sertifi application setting and create new Sertifi application setting.
- Give the API code obtained from the previous step.
- Select the object from which the Sertifi application has to run.
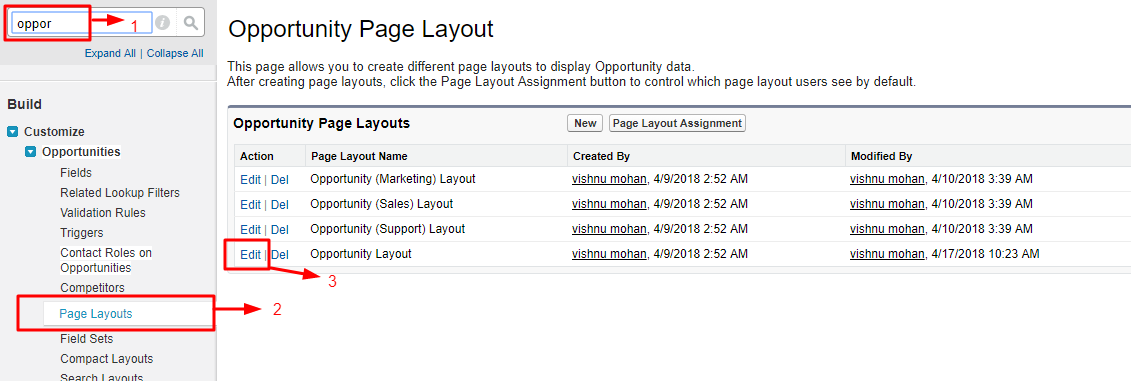
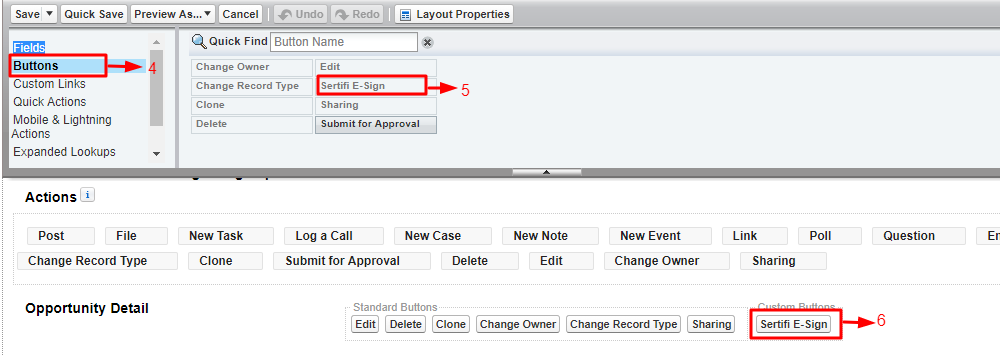
5. Now since we have added the Object for using Sertifi application, we need to go to that particular Object’s layout so as to add the button to the record detail page.
- Go to Setup and type the Object that is used for the Sertifi application (here it is Opportunity).
- Click on Page Layouts.
- Click Edit to edit page layout.
- Click on the Button Section.
- You will find Sertifi E-Sign button here.
- Drag Sertifi E-Sign button and drop in custom button section.
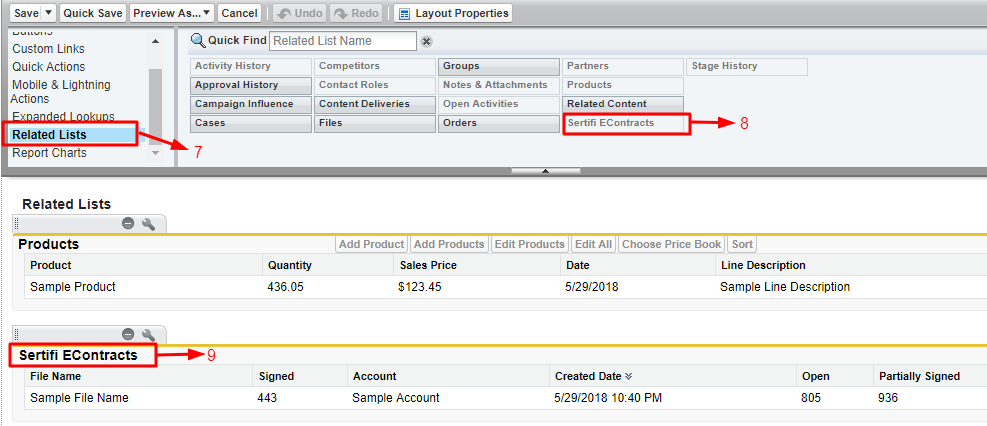
- Now click on the related list.
- You will find another Sertifi E-Sign button here.
- DragSertifi E-Sign related list section and click save.
Now the Org is configured to use Sertifi application.
The Real Life Scenario
Sending documents to customers:
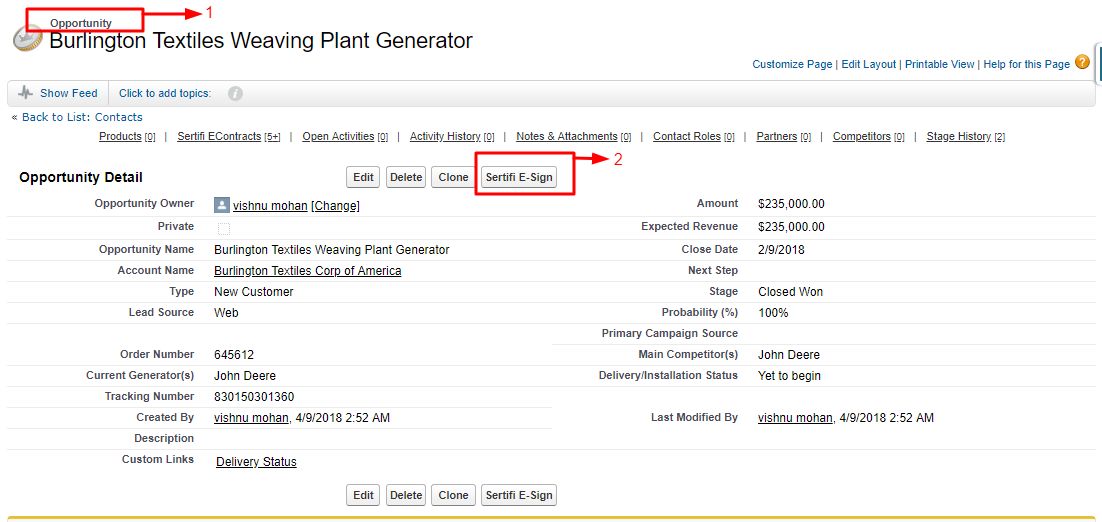
1. Go to the record detail page of Object where Sertifi button has been added.
2. Click the button to add the signers to send the document to their mail address.
3.Adding Signers for the document that is to be sent.
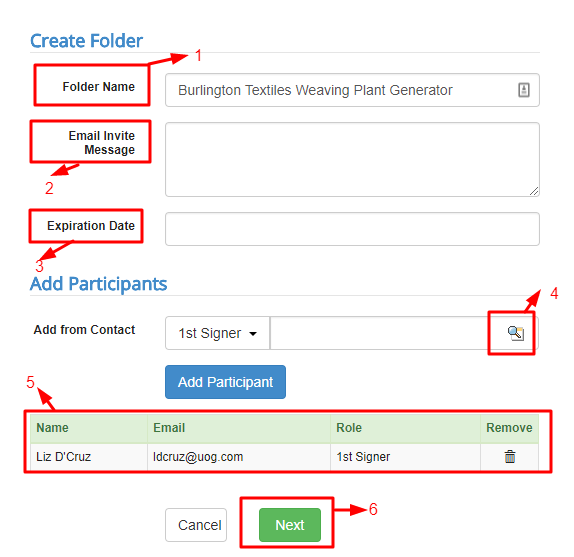
Once we click Sertifi button in Opportunity record, we will be directed towards another page.
- Opportunity’s related account will be displayed as folder name.
- The message which is related to the opportunity or the document that we attach can be added here.
- Here we can give the expiration date for signing the document.
- Here there is lookup button, add the signers from the contacts which is related to the account.
- Once we click add participant, the participant is added as signer.
- Click Next.
4. After clicking Next we will be directed towards another page,
- Here we will be adding the document for signing.
- Choose the document you want to send to client for signing.
- Related notes and attachment of the document can be added here.
- Here we can see the attached/uploaded document.
- By clicking preview we can see the attached document.
- In order to delete/remove the document from the document added list, click here.
- By clicking Send for Signature mail will be sent to the client asking for the signature.
Signing documents by the customer
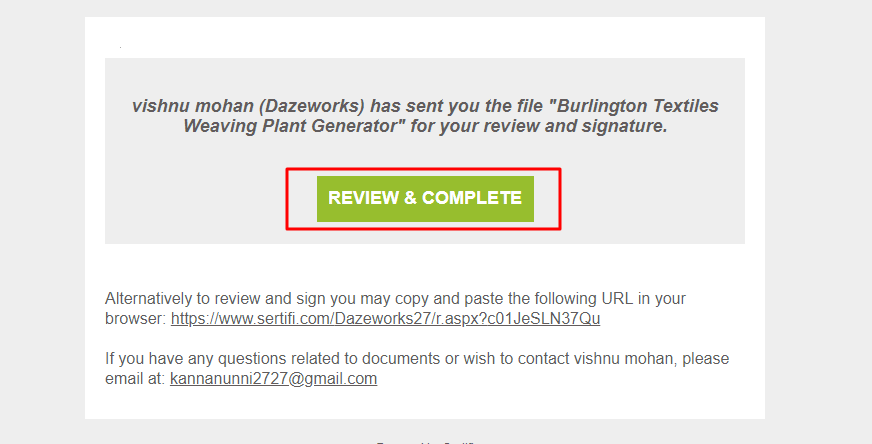
1. Now a mail will be sent to the contact/client/signers asking for the signature.
In the mail, you can find Review & Complete button, on clicking that we will be redirected to another page.
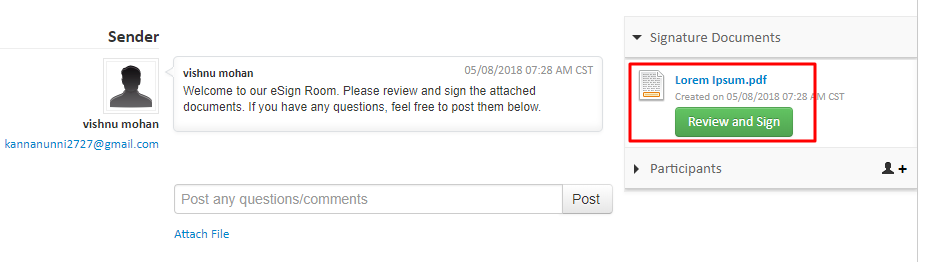
2. Now in this page click Review and Sign button to show the document that is to be signed.
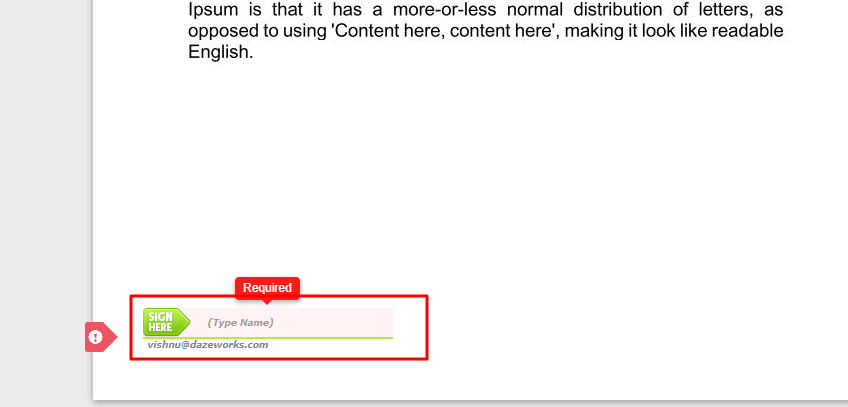
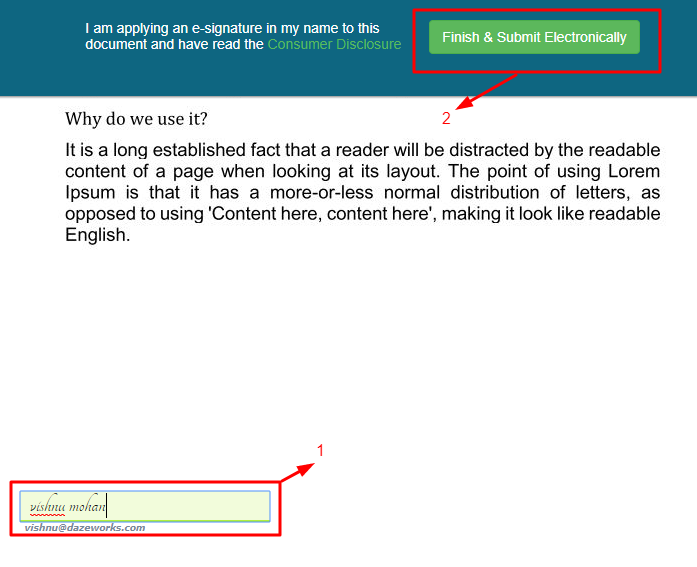
3. In the marked section, type the name to sign the document.
4. Submit the document after signing
- Once we enter the name here, a pop up appears.
- Click Finish and Submit Electronically to submit the document.
The Conclusion
Through this app, there can be an easy communication between the customers and service providers.
1. Digital being added to almost anything makes it a lot faster than the non-digital version of that thing. Similarly, a digital signature can be used to send documents a lot faster, almost instantaneously, as the documents can now be sent via mail and do not need to be delivered in person or via courier.
2. Also, an added advantage would be the decreased cost of sending the documents as the digital signatures are comparatively a lot less expensive than any courier service charge for sending documents.
3. Not only this, a document sent via courier or in person could be tampered with on the way but when sent using a digital signature it gets encrypted in such a way that any kind of tampering with the document is not possible.
4. Further, a document which is digitally signed can effortlessly be tracked and located in a few minutes.
5. Nobody else can fake your digital signature or present an electronic file incorrectly claiming it was signed by you.
6. The documents containing digital signatures are in no way different from documents containing a pen on paper signature as they would even stand in court when produced because a digital signature cannot be copied and also contains a date and time stamp.


