The Beginning
X-Author is an enhanced UI of Excel , which can be used for managing Salesforce Data.It can handle data (CRUD) for an unlimited number of objects simultaneously and the data can be spread across worksheets and in any format – lists, parent child, forms and matrices. It also supports all the necessities for a complete UI like pick lists and record types.
What you Need to Know
Before we jump into this, we should have a basic knowledge of Salesforce and Excel.
- You must be connected to the Internet.
- You must have access to the X-Author for Excel or X-Author Designer executable file.
- You must have Administrator permissions on the computer being used for the install.
- You must close all instances of Microsoft Excel.
- You must have Apttus Licenses, User Assignment and Salesforce Licenses.
What is the Old-School Way of Doing Things?
We can always use the traditional way of handling data, which is by using MS-Excel. But with MS Excel, X Author works more flexibly. If there is an easy and more comfortable way of doing things then why should we stick on to old, difficult and traditional ways.
How does the Appy Ninja Help?
Once you install the X-Author Client app and its configurations, it allows users to bring data from Excel, Word (for contracts) and the rest of Microsoft Office into the Salesforce1 Platform and vice versa, resulting in secure collaboration, data sharing, and boosted productivity across the enterprise. With X-Author, users can bring in the unmeasurable process and analytical benefits of the cloud to their usual and familiar Microsoft-based environment.
How does it Work?
Three things you need to do,
- Install X-Author Executable File.(Received from the Client)
- Install the Runtime and Designer managed packages into your Salesforce Org
- Connect to Salesforce from X-Author.
- Install X-Author.
Double click the installer executable file which will start the installation process. In less than a minute, it will get completed successfully and then open MS-Excel.
Then you can see the X-Author Designer and/or X-Author for Excel ribbon tab should be available in Excel.

- Connect to Salesforce from X-Author.
Now that you have installed X-Author, you just need to open Excel and connect X-Author to your Salesforce org.- To connect to Salesforce from X-Author Designer
- Open Excel.
- In the X-Author Designer or X-Author for Excel ribbon menu, click Connect. If this is the first time you have connected to Salesforce, the Manage Connections window opens.
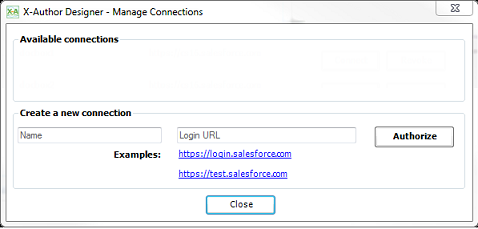
- Under the Create a new connection section and in the Name field, enter the Salesforce.com user name.
- In the Login URL field, type the URL you use to log in to Salesforce.
- Click Authorize. The Salesforce login window opens.
- Type your username and password in the provided fields and click Login to Salesforce.
- To connect to Salesforce from X-Author Designer
- Install X-Author.
The X-Author Designer ribbon is fully enabled. Now you can start designing an app or using existing apps. You can have the option of switch connection and revoke connection using X-Author UI.
There are two ways to create an App in X-Author: –
- Quick App
- App
Here we are focusing on normal App creation.
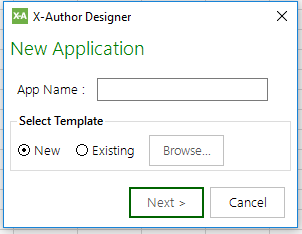
Step1: Apps – New App.
- Enter App Name.
- Choose Existing or New template.
- Select App Type.
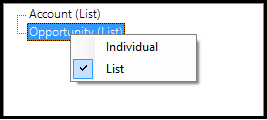
Step2: Select the Salesforce Objects for which the data needs to be worked on.
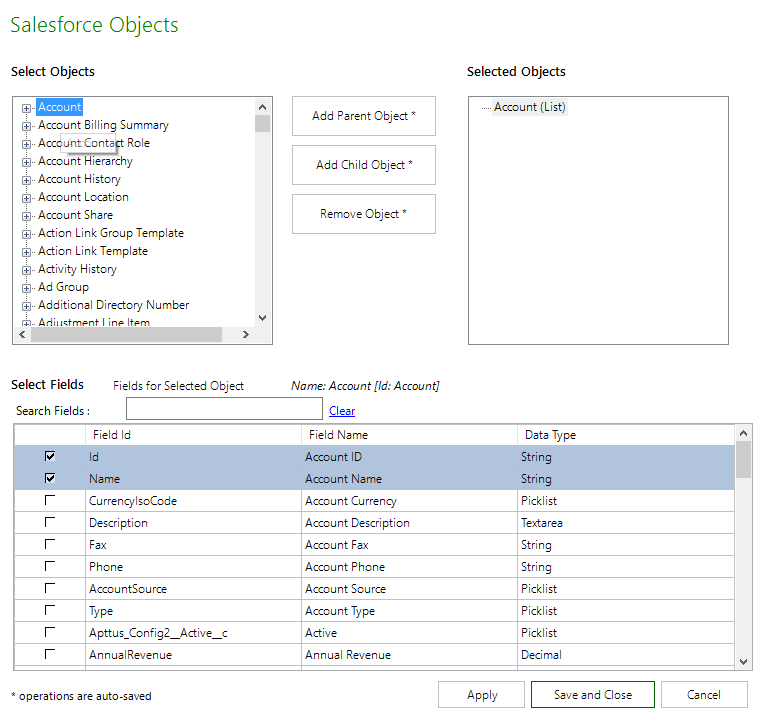
Object behaviour can be changed by right-clicking on an object in Selected Objects.
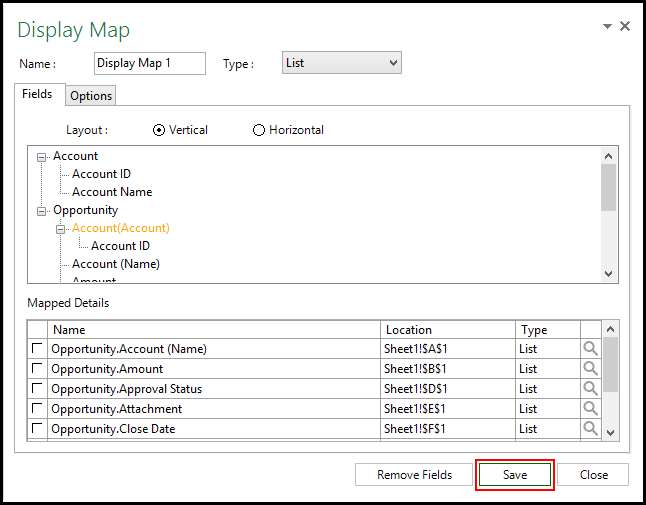
Step3: Create a Display Map
-
-
-
- Choose the fields and drop into the sheet.
- Save and Close
-
-
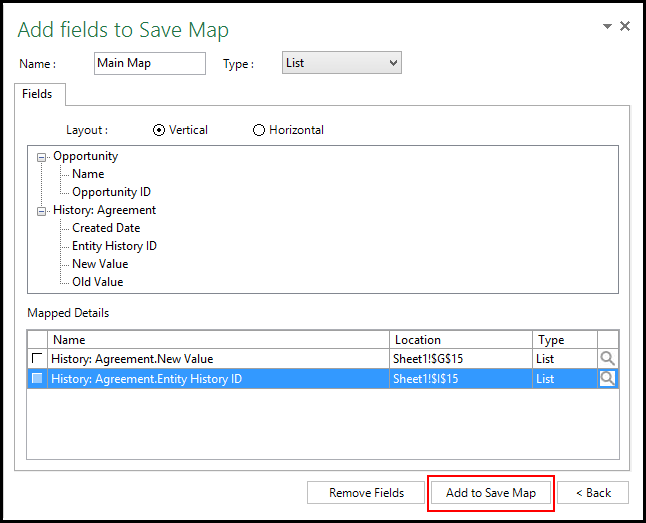
Step4: Create Save Map.
-
-
-
- Add Display Fields.
- Apply and Close and make sure to Save it before closing.
-
-
Step5: Create Action.
The following actions are available. You can choose the appropriate action as per your requirement.
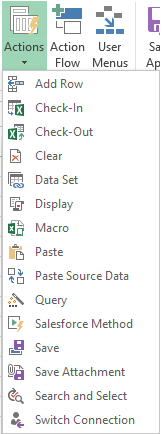
| Action | Usage |
| Add Row | It will add a row to the top or bottom of your Display Map. |
| Check-In | Saves the Excel file to Notes && Attachments in Salesforce and unlocks the file. |
| Check-Out | Opens a previously saved X-Author for Excel file from Salesforce Notes and Attachments and then locks the file to prevent editing by any other user. |
| Clear | It will Clears cell data. |
| Dataset | Combines outputs of Query Actions to overcome SOQL limitations. |
| Display | It will places retrieved data in the worksheet based on a Display Map. |
| Macro | Runs an existing macro. |
| Paste Action | It will Counts the rows from which data has been copied and then pastes the copied data into those rows. |
| Query | It Queries data from Salesforce. |
| Salesforce Method | It Calls a Salesforce Method. |
| Save | It Saves worksheet data to Salesforce based on a Save Map. |
| Save Attachment | It Saves the entire Excel file or specific worksheets in the Excel. |
| Search and Select | Allows a user to search for and select data that will then be retrieved into the workbook |
| Switch Connection | Switches between orgs to allow uploading and downloading data across multiple orgs. |
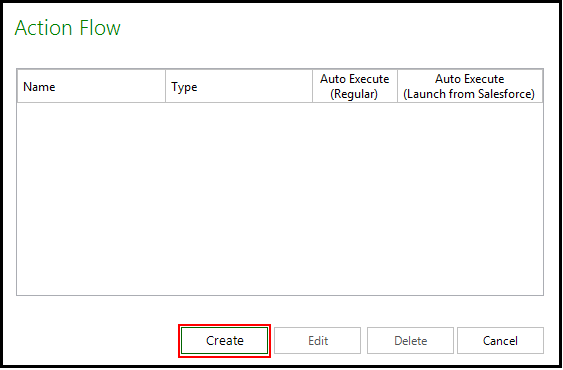
Step6: Create Action Flow.
Action Flow will define a sequence of one or more actions that will be executed when end users click buttons on the app’s ribbon menu.
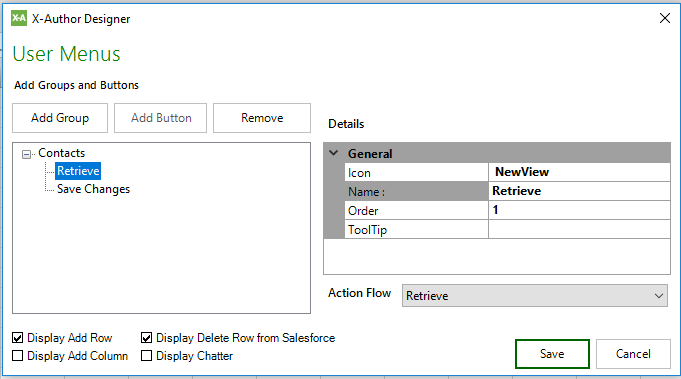
Step7: Create the necessary menu using User Menu option.
User Menu allows designers to create menus that the end user will see in their Excel ribbon when they open an X-Author App in runtime.
Step8: Save the App.
Step 9: Click Preview button for preview.

The Real-Life Scenario
An X-Author for Excel application (app) is created within Microsoft Excel using X-Author Designer. The app is a combination of:
- A Microsoft Excel template that contains the Excel workbook layout.
- An XML file that contains the app-specific User Menus, Action Flows, maps, and other user-experience elements.
Apps are stored in the Applications object within a Salesforce org. X-Author for Excel apps are not related to the Salesforce definition of an application or app. A single X-Author App can include any number of objects that span any number of Salesforce applications. During runtime, the order is reversed. The end user clicks a ribbon button that calls an action flow, which executes a sequential set of actions that retrieve, save, or manipulate the data.
Use Case Scenario: –
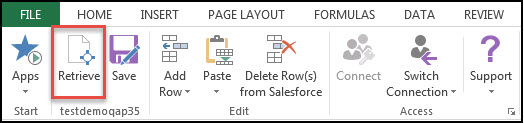
- Once you click the “Preview” button, you can see the “X-Author for Excel tab” and the User Menus as well.
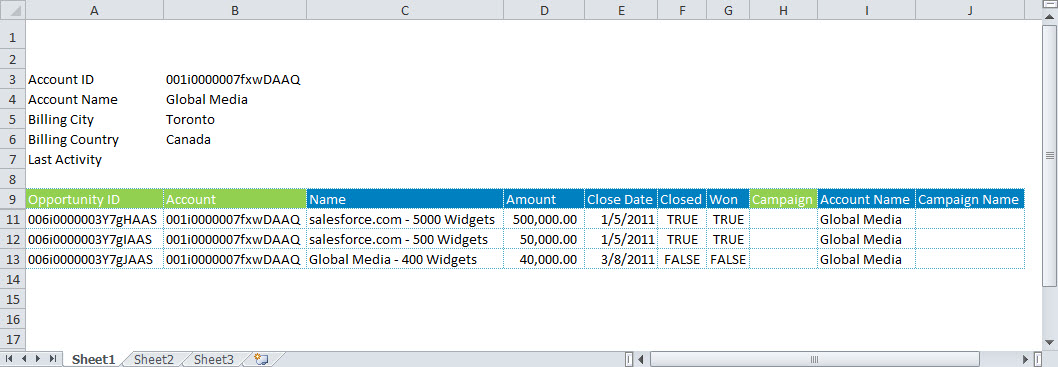
- When you click the Retrieve Button from the Menu, the Search Account window opens.
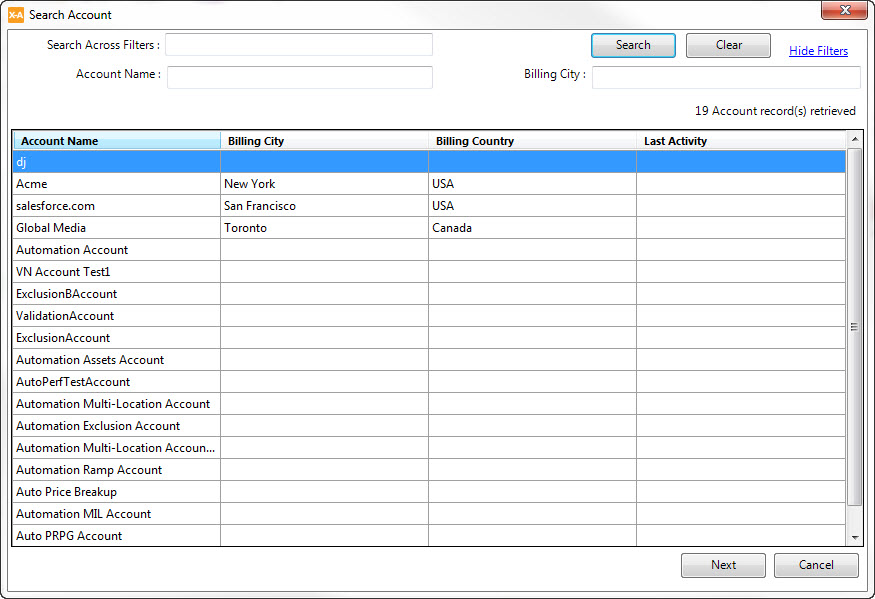
- Double-click the search result you want to retrieve data from, or select a row and click Next. You have successfully retrieved data from Selected Object of Salesforce into Excel.
- Now you can use another Menu option that we use here, like
- “Add Row” – For Adding Records to this salesforce object.
- “Delete Row”- For Deleting Records from the selected Salesforce object.
- Display Chatter- This will display Chatter on the right side of the app.
- There are other Menu options available as well like -Add Column & Paste.
- Save Changes- Once you click this option, all the changes you made will be reflected on the Salesforce Org.
The Conclusion
With X-Author, you can easily build and deploy productivity applications with high scale or you can install ready-to-use applications. This will help to save your time and easily manage millions of data. One of the limitations that we face using this is that the Mac OS X operating system is not supported. However, X-Author can be used on a Mac that is running a Windows Virtual Machine in a VMware or Parallels environment.


