The Beginning
Whenever an organization wants to perform any kind of mass action like mass edit, delete and update on records from any list view or related list for any standard or custom object, the organization can take help from useful applications like “Mass Update + Mass Edit + Mass Delete”. This is available on the Salesforce platform and is easy to work on. Launched in the year 2009 by Versatile Capitalist Inc. This app is available for all editions of Salesforce except Data.com. All you need to do is install it and add buttons.
What You Need to Know
Before knowing about the app’s functioning, we need to be familiar with a few terms:
- Standard Objects: These are objects included with Salesforce, by default. For example, the objects used to store data in standard tabs such as accounts, contacts, or opportunities.
- Custom Objects: These are new objects you create to store information that is unique and important to your organization.
- List Views: Creating a list view allows us to see a specific set of contacts, documents, or other object records. You can also create views of contacts, leads, users, or cases for mass email recipient lists.
What is the Old-School Way of Doing Things?
Currently, in Salesforce “Mass Delete” and “Mass Edit” are the only functionalities available for Standard objects. But for “Mass Edit”, when we choose multiple records, we can edit only one field at a time. From this, rest of the records will be changed to whatever we specify. With this app, we can “Mass Edit” multiple records by editing multiple fields at the same time. For Custom objects, no such functionality is available.
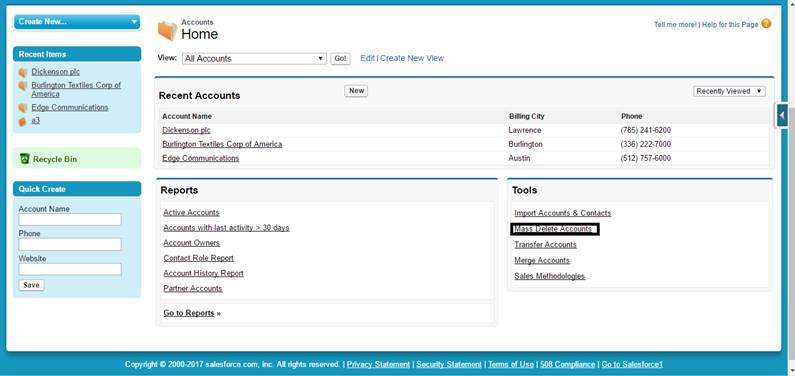
When we click on “Mass Delete Accounts” it allows us to delete a list of Accounts from Salesforce.com. The following data will also be deleted:
- Account Notes
- All Contacts associated to this account plus all related Contact Data.
- All Opportunities on Accounts.
- All Activities associated with the Accounts.
Once data is deleted, it will be moved to the Recycle Bin.
But with the “Mass Update + Mass Edit + Mass Delete” app, we can choose any functionality like an update, edit and delete for both Standard and Custom Objects.
How does the Appy Ninja Help?
With this App, we can seek a great advantage in performing mass operations like Update, Edit and Delete. Not like regular field updates, it has got new features which include 3 buttons and are used only for standard objects which are present instantly after installation. Saving time and process, users can perform more actions in a small period of time.
How Does it Work?
For Standard objects:
Step 1: Add Mass Update, Mass Edit and Mass Delete buttons to Leads, Accounts, Contacts and Opportunities list view: For adding buttons we need to follow the below steps:
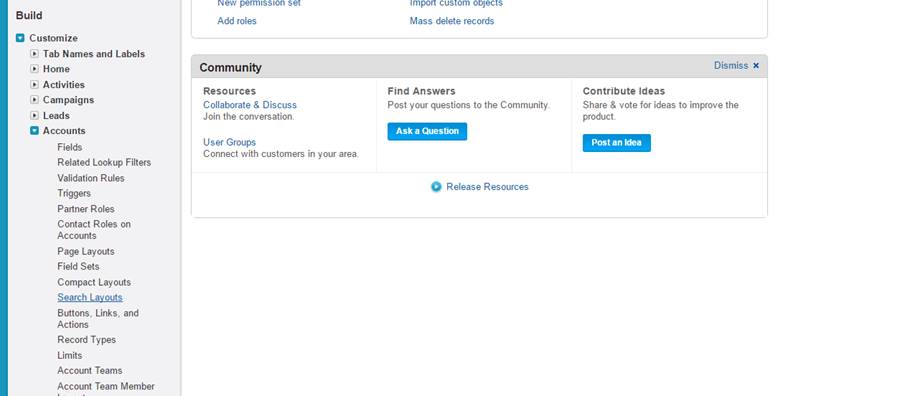
Go to Setup -> Customize -> Select the standard object( Leads/Accounts/Contacts/Opportunities) -> Go to the selected object’s search Layouts, edit the object’s list view and add Buttons.
For Custom objects:
Step 1: Go to Setup -> Select the standard object( Leads/Contacts/Accounts/Opportunities) -> Click on buttons and links section -> Go to Mass Edit or Mass Update button and copy the javascript code.
Step 2: Now go to the custom object where you want to perform Mass Update, Edit , Delete -> Create a Mass Edit/Update Button (List view & on click javascript type) and paste our code.
Step 3: Update the code to work with your custom objects/custom field.
Real Life Scenario:
Let’s now get to know the App functioning and how it works in Salesforce.
Functioning with Standard Objects:
Once the App is installed successfully in your org you will have three additional buttons (Mass Update, Mass Edit, Mass Delete) added to the List view of your Standard Object. If the buttons are not added automatically to the list view of the Standard object, you will need to add them for each Standard object from the Salesforce setting by following the steps mentioned below:
Step 1: Go to Setup | Customize | Standard Object (for example “Account”) | Search Layout
Step 2: Click edit next to the “Account List View”
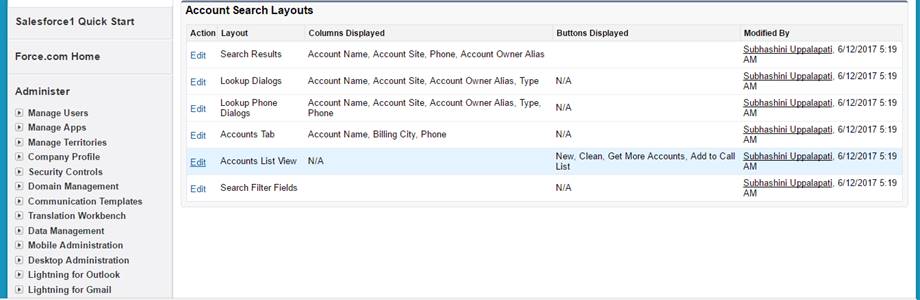
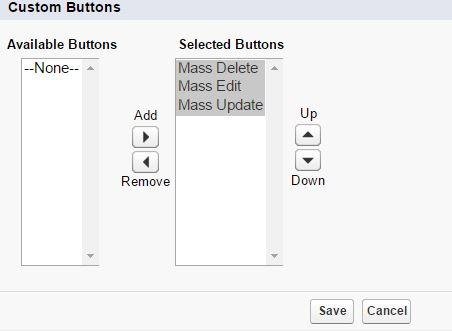
Step 3: Select the “Mass Delete”, “Mass Edit” and “Mass Update” buttons from the Available Buttons section and add them to the selected buttons section and click save.
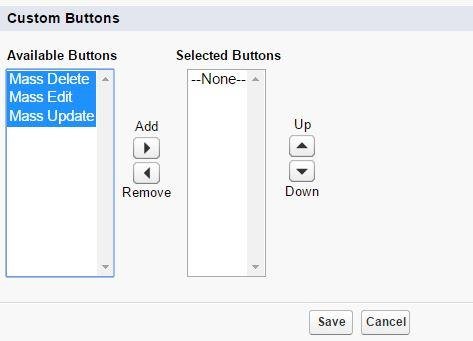
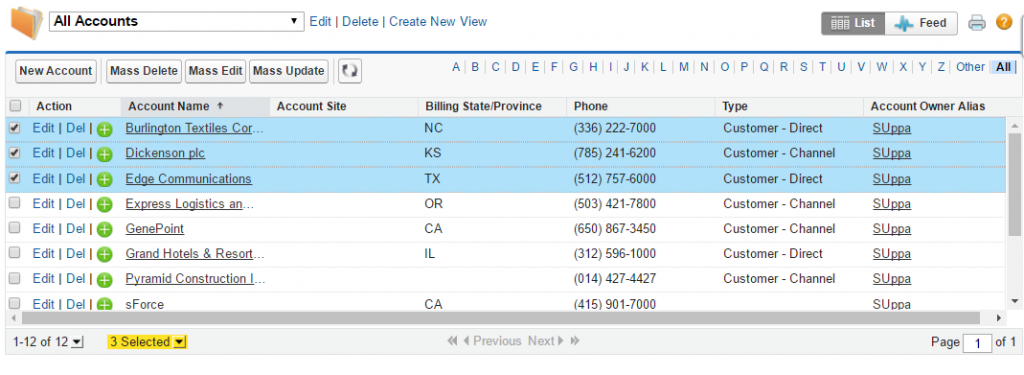
Step 4: Select “All Accounts” in View and then click “Go”
The same steps need to be repeated to add those buttons to the list view of any Standard object. These buttons can be used to mass Delete/ Edit / Update records of any Standard object as shown below:

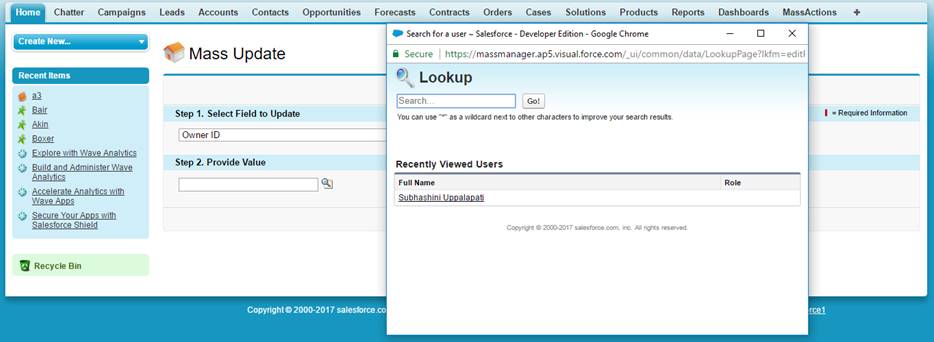
Step 5: Select the records to be edited and click “Mass Update”.
Step 6: Select the field and value to be updated and click Done.
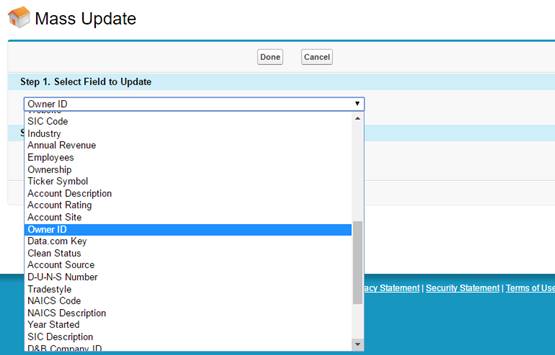
This is how the records of any Standard object can be mass updated using the “Mass Update” button. Similarly, “Mass Delete” button can be used to mass delete the records and “Mass Edit” button can be used to mass edit the records from the list view of any standard object after installing this application.
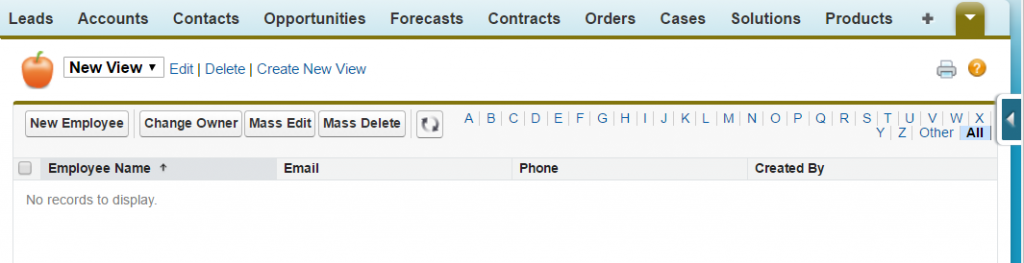
Functioning with Custom Objects:
“Mass Update”,”Mass Edit” and “Mass Delete” actions can also be performed on custom objects by creating our own custom buttons. The step-by-step process is as follows:
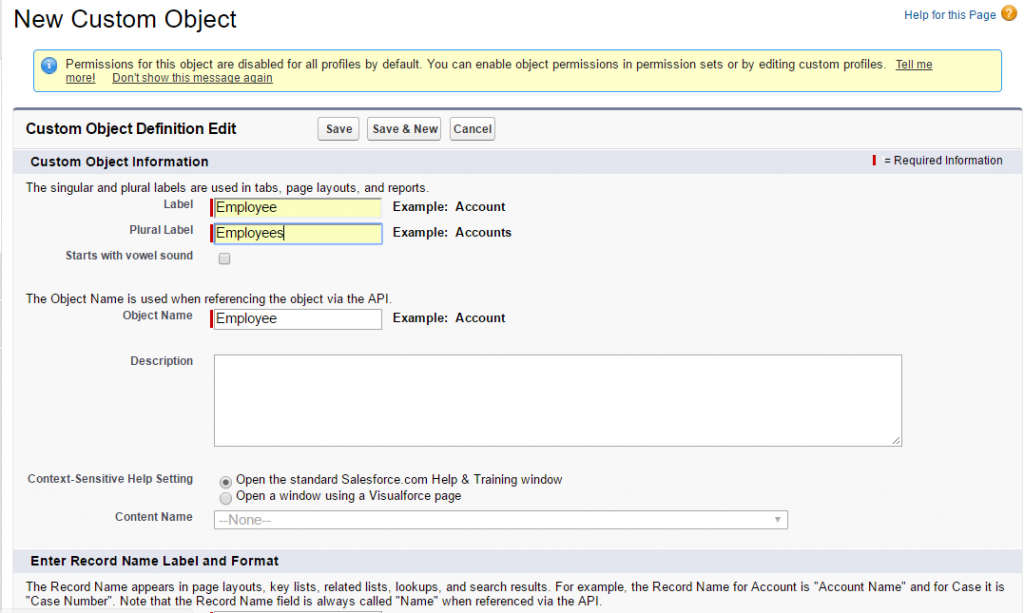
Step 1: Create a custom object.
Step 2: Create records for the custom object that has been created above to perform mass operations.
Step 3: Go to Setup | Leads/Contacts/Accounts/Opportunities | Button and links | Go to Mass Edit, Mass Update or Mass Delete buttons.

Step 4: Click Edit and copy the code.
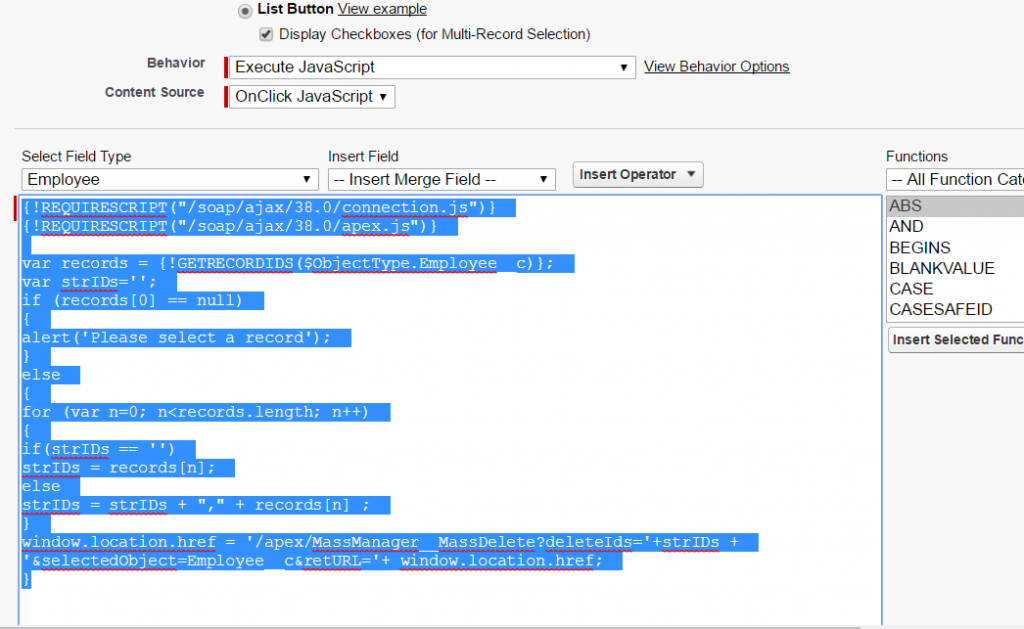
Step 5: Go to your Custom Object | Button, Links and Actions | New Button or Link | Create a Mass Edit/Update/Delete Button (List view & on click JavaScript type) and paste our code. Update the code to work with your custom objects/custom field.
I’m sharing this code in Github as well.
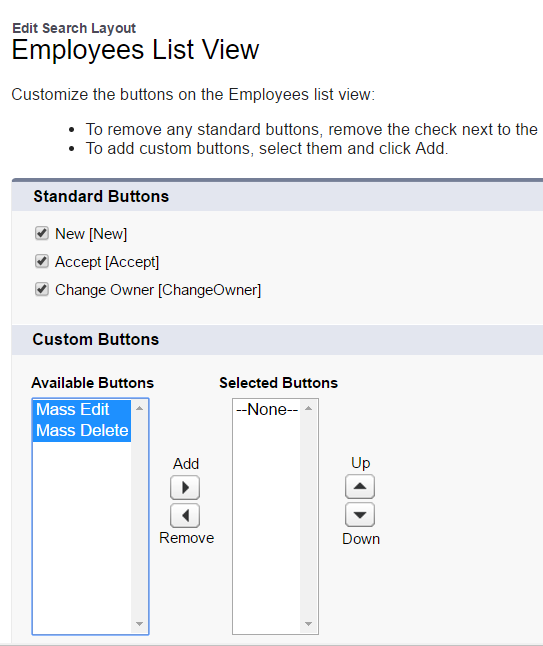
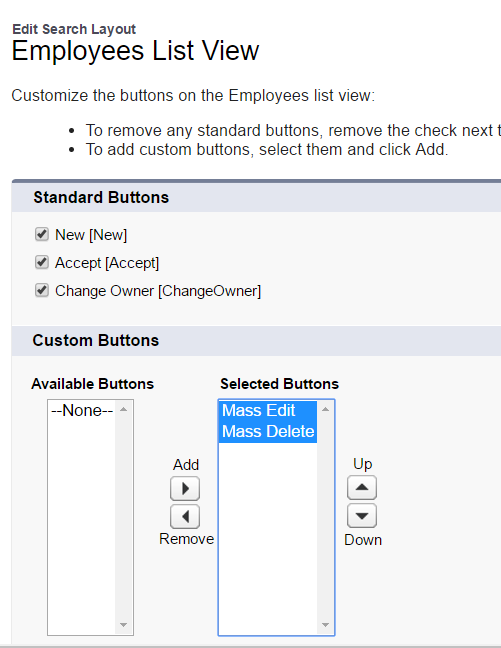
Step 6: Go to Objects | Your Custom Object | Search Layouts | Edit Employee List View.
Select the buttons from Available Buttons section and add them to the Selected Button section and click Save.
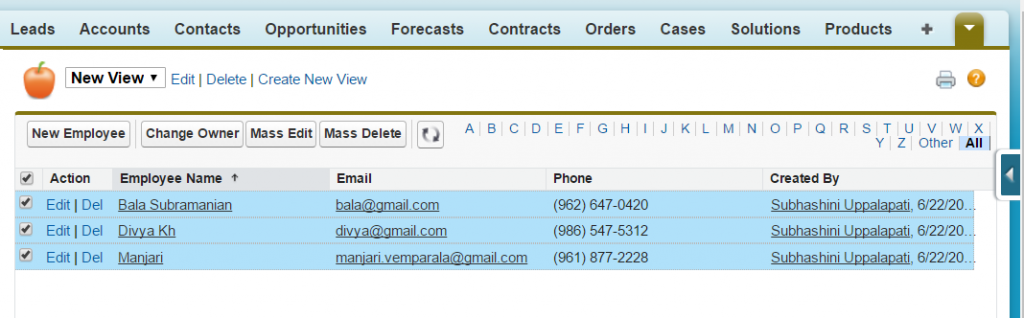
Step 7: Click on your custom object tab, click “Go” and select the records to be edited/updated/deleted and click the respective button.
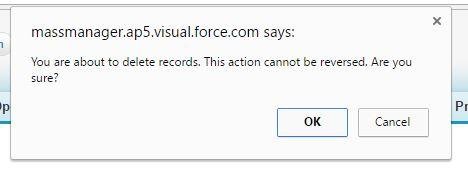
Step 8: On clicking the button, the actions like edit, delete and update takes place. And finally, when we click on the delete button we get a small alert box asking us whether we would like to continue or not.
Step 9: On clicking “OK” we can see that all the selected records are deleted and we can view a page without the previous records.
Conclusion:
The ability to mass edit, update, and delete from a listview saves so much data entry time and It is now more easier to make changes within the system.
Thus, for any mass processing functionality “Mass Update + Mass Edit + Mass Delete” application is a highly recommended method.