Deployment using ANT Migration Tool
minutes read
Though there are a lot of tools available to develop in Salesforce, when it comes to deployment there are only a few options out there.
Changesets from Salesforce Site – Almost the easiest way to do Salesforce deployment, but certain components cannot be deployed through changeset since it is not handy sometimes when we need to deploy certain components alone.
Eclipse IDE – Most preferred deployment method so far, but I find it really hard because of the slowness, takes time for the deployment.
Why ANT Tool?
- While deploying Metadata from an organization to another using Salesforce migration ANT tool, it retrieves metadata locally while deploying that same data to the same organization.
- While using the Salesforce migration ANT tool, it provides extra tools that can be used and the advantage is to get metadata in the form of XML from servers and downloads directly to your computer and makes the necessary changes to any server.
- The metadata is being downloaded to your computer locally from the server so you can make changes in XML files and deploy any changes made to any server.
- Components which cannot be migrated using changesets in salesforce.com can be migrated using Salesforce migration ANT Tool.
- However, it can also be run from the command prompt and using specific commands for APIs. This is the main advantage of the Salesforce migration ANT tool.
- It provides the capability, to deploy with test level specified or ignored.

Prerequisite:
ANT Distribution
You can download from this link.
Setup the ANT environment variable through the following steps:
- Unzip the zip file to a convenient location c:\folder. using WinZip, WinRAR, 7-zip or similar tools.
- Create a new environment variable called ANT_HOME that points to the Ant installation folder, in this case, c:\apache-ant-1.8.2-bin folder.
- Append the path to the Apache Ant batch file to the PATH environment variable. In our case, this would be the c:\apache-ant-1.8.2-bin\bin folder.
- Login to Salesforce -> Navigate to Search -> Develop -> Tools -> Lightning Platform tools & toolkits or go to this link directly to download the Salesforce ANT migration jar.
Let us consider two environments from one sandbox to another where you are going to deploy the code.
- Create two directories – Source Org and Target org.
- Unzip the RAR file and place in the directory.
- To start the ANT deployment, we need the build.XML file. The build.xml file contains the properties to make the connection to the org, type of deployment which you want to perform in commands which we are going to see later.
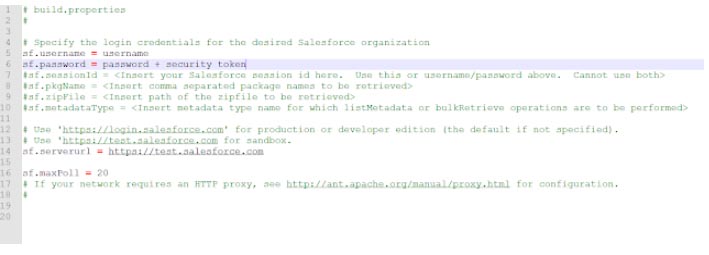
- Build.properties file has the credentials of the organization that needs to be connected through ANT tool.
Here we are going to retrieve Code from the source Org.
-
- Open the command prompt.
- Use the change directory command and navigate to the target folder which has the build.xml.
- Enter the command – ant and if the build is successful, you will be able to connect to the Org.
- Now to retrieve the code use the command – ant retrieveCode
- In the build.XML, you can find the target name = “retrieveCode” which will get executed to retrieve your code from the Org.
retrieveTarget = Directory in which the code has to be retrieved.
<target name="retrieveCode">
  <!-- Retrieve the contents listed in the file codepkg/package.xml into the codepkg directory -->
  <sf:retrieve username="${sf.username}" password="${sf.password}" sessionId="${sf.sessionId}" serverurl="${sf.serverurl}" maxPoll="${sf.maxPoll}" retrieveTarget="codepkg" unpackaged="codepkg/package.xml"/>
</target>
Now we are going to deploy the code retrieved from source org to target org.
- Copy and paste the component that needs to be deployed to target org.
- Make sure you give the credentials in the build.properties of the target org.
- Open the command prompt.
- Use the change directory command and navigate to the target folder which has the build.xml.
- In the deployRoot folder, edit the package.XML and add the targets that need to be deployed.
- deployRoot – is the directory in which components that need to be deployed are placed and mentioned in the build.xml.
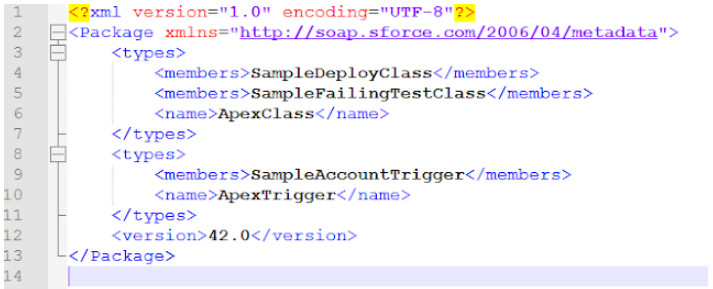
As seen in the above screenshot, following components are expected to be deployed:
- SampleDeployClass
- SampleAccountTrigger
- SampleFailingTestClass
ant deployCode – This will deploy the code with the unit test specified. <target name=”deployCode”>
       <!-- Upload the contents of the "codepkg" directory, running the tests for just 1 class -->
       <sf:deploy username="${sf.username}" password="${sf.password}" sessionId="${sf.sessionId}" serverurl="${sf.serverurl}" maxPoll="${sf.maxPoll}" deployRoot="codepkg" testLevel="RunSpecifiedTests" rollbackOnError="true">
         <runTest>SampleDeployClass</runTest>
       </sf:deploy>
     </target>
If the test is successful, this will deploy the code to the target org.
ant deployCodeNoTestLevelSpecified – this will not run any unit test and simply deploy the code to the Org.
<!-- Shows deploying code with no TestLevel specified -->
     <target name="deployCodeNoTestLevelSpecified">
       <sf:deploy username="${sf.username}" password="${sf.password}" sessionId="${sf.sessionId}" serverurl="${sf.serverurl}" maxPoll="${sf.maxPoll}" deployRoot="codepkg" rollbackOnError="true"/>
     </target>
ant deployCodeRunLocalTests – this will run only the local test and deploy the code to the org.
<!-- Shows deploying code and running tests only within the org namespace -->
  <target name="deployCodeRunLocalTests">
    <sf:deploy username="${sf.username}" password="${sf.password}" sessionId="${sf.sessionId}" serverurl="${sf.serverurl}" maxPoll="${sf.maxPoll}" deployRoot="codepkg" rollbackOnError="true"  testlevel="RunLocalTests"/>
  </target>
For deleting components in the Org:
Delete components from Salesforce Organization using “destructiveChanges.xml” :
In some cases, we may want to delete some components like object or fields from the Salesforce organization. In this case, only “package.xml” will not work. We need to create “destructiveChanges.xml” file also. The syntax for this file is exactly the same as “package.xml”, except that here we cannot define wildcards. So, to undeploy anything from Salesforce org, we need two XML files – “package.xml” and “destructiveChanges.xml“.
ant undeployCode – This will delete the components specified in the destructiveChanges.xml
<!-- Shows removing code; only succeeds if done after deployCode -->
     <target name="undeployCode">
       <sf:deploy username="${sf.username}" password="${sf.password}" sessionId="${sf.sessionId}" serverurl="${sf.serverurl}" maxPoll="${sf.maxPoll}" deployRoot="removecodepkg"/>
     </target>
Here is sample package.xml with types and names that need to be used for deployment.
Conclusion:
Though a little bit of effort is needed to setup the ANT tool initially, it allows retrieving the metadata XML locally, deploying to the various environment by just running few commands in the command prompt. This is very handy compared to other deployment modes.